AWS Glue, DataBricks & AWS S3: The Holy Trinity of Data Integration
Have you ever pondered the integration of AWS and Databricks, as well as the functioning of delta tables in conjunction with AWS Glue to establish a serverless data integration pipeline? If you’re an individual eager to acquire knowledge about Databricks and AWS, and you’re in the process of configuring an environment for your learning journey, then this article is tailored to your needs. Within this article, we will walk you through the steps of creating a DataBricks development environment integrated with AWS Glue and AWS S3. (1) Creating AWS Account (2) Creating DataBricks account (3) Integrating DataBricks with AWS (4) Creating Instance profile (5) Launching cluster with proper permissions and (6) Creating sample tables
keywords — AWS, DataBricks, AWS Glue, Glue, Serverless, Pipeline, Integration
Creating AWS Account
AWS offers a one-year free tier, allowing you to use various services within specified limits without incurring charges. (Please note that certain services, such as EC2 i3.xlarge and NAT Gateway, are chargeable and not covered by the free tier) After setting up your AWS account, you can proceed to create an S3 bucket to serve as the storage location for our delta tables.

Let’s now proceed to create the AWS Glue database that will be available in DataBricks. To do this, navigate to the “Add database” option within the AWS Glue Data Catalog, and select any path from the bucket we created in the preceding section of this article, as shown in the image below

Creating DataBricks account
Databricks offers a 14-day free trial for newcomers. To get started, you can create an account by following this link. During the sign-up process, you will be directed to a page where you can choose your cloud provider; please select AWS from the available options. After verifying your email and setting a password, sign in to your DataBricks account. Next, choose your AWS region and workspace name, and then click on the “Quick Start” option.

Integrating DataBricks with AWS
After clicking on “Quick Start,” you’ll be directed to the AWS Create Stack console within CloudFormation. Here, you should input your Databricks password and then proceed to click “Create Stack.” This action will result in the creation of several resources that facilitate the connection between Databricks and AWS.

After the stack has been successfully created, return to the Databricks homepage. Select the “Workspace” option and click on the provided link located at the end of the metastore created by your stack. This will redirect you to your workspace.

Login to your workspace, and you will see a screen as given below:

Within this window, you will find all the familiar Databricks options that you typically encounter. These include the “Workspace” where you can create notebooks, “Compute” where you can set up computing resources, “Workflows” for job scheduling, and other available options.
To begin, create a sample notebook within the workspace. In order to run this notebook, you will require an EC2 instance with permissions to access both the S3 bucket and AWS Glue, enabling you to utilize the data catalog services.
Creating Instance profile
Proceed to the AWS Identity and Access Management (IAM) console, and within the “Roles” section, generate a new role specifically for EC2. This role should be endowed with permissions to access both AWS Glue and the previously created S3 bucket, as mentioned in this article. (In this example, for simplicity, full access to S3 and AWS Glue has been granted to this IAM role. However, in a real-world scenario, it’s advisable to provide only the necessary and limited access required for this role)

Launching cluster with proper permissions
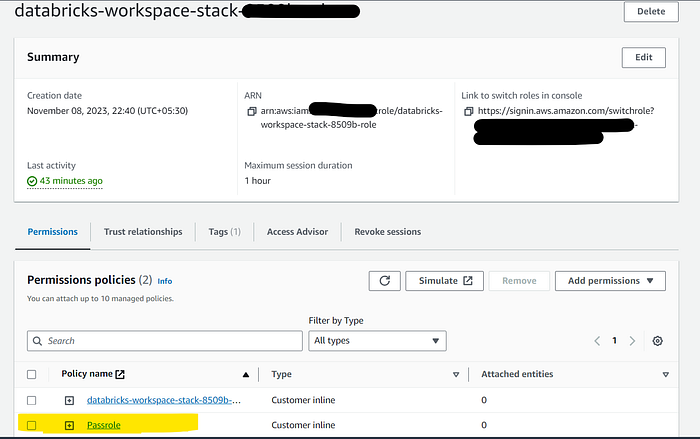
Before adding the instance profile in DataBricks, it’s essential to grant the “iam:PassRole” permission to the workspace role that was created by the stack.
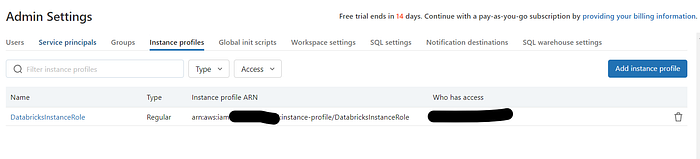
To launch a Databricks cluster with the necessary permissions, you must add the role created earlier to your Databricks account. To achieve this, navigate to the Admin settings, and within the “Instance Profiles” tab, add the Instance profile.
Next, access the “Compute” tab, and click on “Create Compute.” Then, configure the settings as outlined in the image provided below:
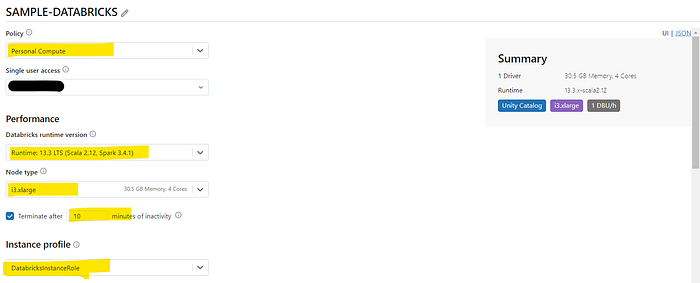
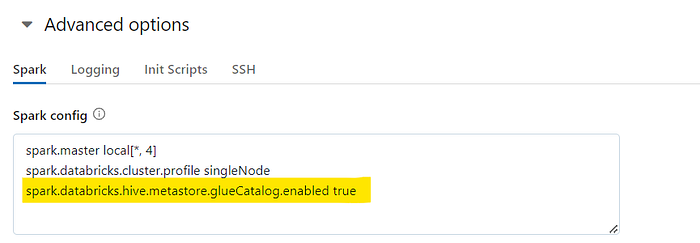
Ensure that you’ve chosen the instance profile you added in Databricks’ Admin settings earlier. Scroll down, access the “Advanced Settings,” and activate the Glue Catalog service by using the command specified in the image below:
Now, click on “Create Compute” and patiently await its initiation. The process typically takes approximately 5 to 8 minutes to complete.
Creating sample tables
With our DataBricks cluster up and running, and with access to both S3 and AWS Glue, we can now proceed to create delta tables in S3 locations. To confirm this capability, let’s create a sample table within the Glue database, placing it in an S3 location under the bucket we established at the beginning of this article.
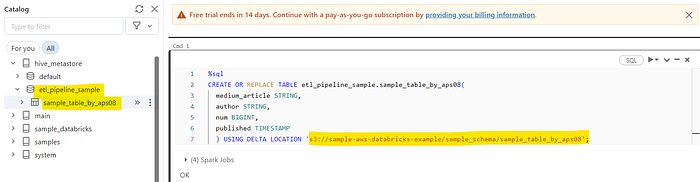
In the image below, you can observe that we have successfully created a table named “sample_table_by_aps08” within the AWS Glue database labeled “etl_pipeline_sample.”
This table is situated at the S3 location “s3://sample-aws-databricks-example/sample_schema/sample_table_by_aps08” On one side of the image, you can also see the AWS Glue Database that we established earlier in this article, as well as the newly created table.
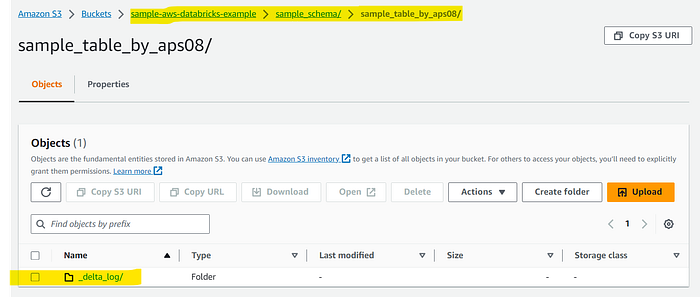
If that’s not sufficient, you can navigate to the provided S3 location, and you’ll find files generated by Spark, as demonstrated in the image below.
And that’s how you can setup your DataBricks development environment integrated with AWS Glue and AWS S3.